Saturday, December 31, 2016

Tygerberg Photographic Society - November 2016


Ok - Final blog post for 2016! And the final TPS meeting for 2016. It wasn't the greatest way to end the year - three Silver awards and one Bronze award, but at least it's good motivation to do better next year! Again - please click on the images for the large versions.

Set subject for November was "Action". A really difficult subject to find something different to shoot. Both my shots were taken at the Zone 7 Speed Spot just off the N7. I quite like both images, but both received Silver ratings, mainly because the judge found the backgrounds distracting.

This was my entry in the print section.


And then this one in the digital section:
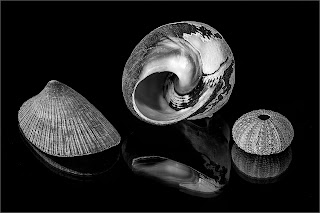


                                                                                                                                                                            For the open digital section, I chose two monochrome images. The first one was of a selection of sea shells. To get the reflections, I set them up on my iPad. I like the image, but can see why it didn't get Gold.


The final image was also taken at Theewaterskloof Dam. I titled it "Desperate for that rain", wanting to highlight the clouds and the fact that we get so many promises of rain without the rain materialising, as can be seen from the dam levels. Anyway, the judge wanted to see more detail in the sand in front (?) and didn't like the image at all, hence the Bronze rating. But you know what? - I like it anyway!


So all that's left now is to wish all you lovely people who have taken time out to read my ramblings this past year. I wish you all the most magnificent 2017 - may it be the best year ever! Take care.

Friday, December 30, 2016

Tygerberg Photographic Society - October 2016


October's set subject was "Reflections". We had three of our top photographers sharing duties as judges for the evening, and they did a fantastic job!


For my print entry, I chose a photo taken at the Theewaterskloof Dam. I really like the feel of the image, and luckily so did the judges. My first of two Gold awards for the evening.


My digital entry for the set subject section was taken at the Thesen Islands residential complex. It's a really beautifully conceived development and this image, taken from under one of the road bridges, reflects a typical scene there. This image received a Silver award.


My pride and joy for the evening, however, is this photo taken of one of Jacqui's beautiful display of Spring flowers. It is just a simple anemone, but the colours are absolutely amazing, and the stacking process (7 photos) worked really well. The image scored Gold and was the winner in the print open category.


My final entry, in the digital open section, was taken during a day trip to the Rawsonville area. Again, I really love the feel of the image, and it displays the incredible contrast in people's values. The housing and living conditions are by no stretch of the imagination the greatest, yet satellite TV has to be had! The judges found the image too "busy", and it received a Silver rating.


Just one more TPS meeting for the year to cover and hopefully I will post the commentary tomorrow and start 2017 off with a clean slate!

Tuesday, October 25, 2016

Tygerberg Photographic Society - September 2016


Wow - talk about a bloodbath! Not a single Gold submission - just two Silver and two measly Bronze awards! Oh well, I suppose one can't win them all! At least I wasn't the only one - it was a poor evening results-wise for the majority of club members.

The Set subject for the month was Monochrome. Again, please click on the images for larger versions.

My entry for the Set Print section was a photo taken of one of the hundreds of anemones we were blessed with after Jacqui's hard work this Spring (the colour version will be posted next month). I specifically wanted to focus on the centre section of the flower, and tried to blend the petals into the white background. Well, the judge apparently didn't like the concept and wanted to see the petals in more detail, so I gathered my first Bronze of the evening!


For the Set Digital entry I used a photo taken at an organised "Pokemon Go!" event (my Blog post on the subject can be viewed here). The whole object of the image was to show a diversity of people all mesmerised by their cell phones and catching Pokemons, but the judge said there were "obviously" no persons catching Pokemons there! And so the second Bronze arrived.


My Open print entry was taken during the holiday Jacqui and I had earlier this year. It was taken while on an evening cruise on the beautiful Knysna lagoon, and I thought (still think) it has a nice tranquil feel about it. There are apparently some technical issues with the image (unfortunately I couldn't hear exactly what the judge said and have been unable to spot them, but accept his judgement), but at least it received a silver rating.


My final image for the evening was take a while ago during a visit to a Blacksmith factory. I really liked the vibrancy of the sparks and the feel of the photo. The image was judged as being a "record shot", but thankfully also at least received a Silver rating. Let's hope tomorrow night brings some better results!


Wednesday, October 12, 2016

Macro image stacking


Introduction

I make use of this technique for many of my macro images, and have been asked by my Photographic Society to do a short talk on the subject. These are my notes for the talk. Any suggestions for improvements, or comments on any corrections that need to be made will be most appreciated.

Please click on the images for a large view.

This is an essential technique for macro images where one needs more depth of field than a single normal macro image can deliver. It is also a technique that can be used in landscape photography, where the use of the hyperfocal distance method does not give an acceptable result.

There are also different methods and software that can be utilised, but these notes are based on the following equipment and software, namely:

  • Photoshop CS6 as the software
  • Canon 6D as the camera
  • Canon EF 100mm f/2.8L IS USM as the macro lens
  • Manual focus
  • Shoot in RAW
  • In Adobe Camera RAW, I use the following settings:

o   Colour space:          sRGB
o   Depth:                     16 Bits/Channel
o   Resize to fit:            Default
o   Resolution:              300 ppi
o   Sharpen for:             Screen
o   Amount:                   Standard
  • If the initial image needs RAW adjustments, those settings can be saved as a Preset, and the same Preset applied to all images that will be stacked. The workflow illustrated below differs slightly from this, but is quicker and achieves the same result. After applying the Preset to all images, I just click on the Done button, i.e. I do not open the image into Photoshop at this stage.

Setup essentials (in addition to camera and lens)
  • Tripod
  • Remote shutter release or cable release
  • If lens has stabiliser, turn it OFF
  • Select aperture priority, ISO at 100 or smallest number camera will accept, shutter speed will then be automatic
  • No air movement, i.e. studio setup desirable


Method

Generally speaking, one can use trial and error to determine the number of images that need to be taken for the stacking process. Technically, it’s reasonably (in my case – very) complicated! There is an excellent article on macro photography, explaining these intricacies, and it can be found here:  http://www.cambridgeincolour.com/tutorials/macro-lenses.htm. Good luck! Note: The magnification factor calculator provided there should be ignored as it doesn't cover all situations. Instead, to calculate the magnification factor, simply take the height (or length if you are doing a portrait shot) of your sensor (in the case of a full-frame camera the sensor size is 36mm x 24mm), and divide that by the height (or length if you are doing a portrait shot) of the subject.

Here is an extract from the website, showing a calculation for the effective depth of field for a full-frame camera with a sensor size of 36mm x 24mm, using an aperture of f/8, and for an object which is 48mm high (twice the height of the sensor, giving a magnification factor of 24mm divided by 48mm = 0.5). You will see that the DOF is minimal at just over 3mm!!! So if an image had a depth of 30mm, and you wanted to capture all the detail, you would need at least 10 images for the stack.


Stacking Procedure

Prepare for shooting and set up subject, lighting, tripod and camera. It’s important at this stage to test the setup to ensure that when focusing both at the front and back of the subject, that the full subject is in the frame and that no edges are cut off. Move the camera further away from the subject until this has been achieved.

The images below illustrate the procedure for photographing a watch, with an actual required depth of field of 48mm, an aperture of f/11, and a magnification factor of 0.3 (24mm divided by 80mm). The DOF as per the http://cambridgeincolour.com calculator is approximately 10mm, so at least 5 images will have to be shot.


Take the required number of photographs, making sure that all sections of the object have been captured in focus. There are different ways of taking the photos to be stacked. One way is to use a rack – they can be extremely sophisticated (and expensive), or very simple (and cheap), like this one:


For my personal tastes, though, I just prefer to focus on selected areas along the subject. I make use of the LiveView option on the camera, use the magnification option to zoom in to the particular area, focus and shoot.


Load the images into Bridge and select the images for the stack.


Double-clicking on one of the images opens them up in Camera Raw (if they are Jpeg images, then hold down the Ctrl button on Windows (cmdbutton on Mac) and press “r” to open in Camera Raw. Click on the Select all button as indicated, make adjustments as required, and then press the Donebutton.


Back to Bridge and from the menu, select Tools, Photoshop, Load Files into Photoshop Layers.


Photoshop will open and stack the images one on top of the other in different layers. Select all layers.


From the Photoshop menu, select Edit, Auto-Align Layers, and click Auto. After the processing has been completed, from the Photoshop menu, select Edit, Auto-Blend Layers, and click Stack Images and Seamless Tones and Colours.

Photoshop after Auto-Align and Auto-Blend:


Check stacked image and crop as required, merge layers (Layer, Flatten Image), and then do any final adjustments.  Final image: